Ticking checkboxes is one of many great features built into Microsoft Word. Here’s how to insert checkboxes in the program, and how to interact with them.
Whether you’re outlining a recipe or putting together a daily to-do list, Microsoft Word is a great tool for keeping all your ideas and information organized. Beyond its word processing capabilities, you’ll even be able to create electronic checkboxes that you can tick and untick. It’s really easy to do, and we put together this step-by-step guide to teach you how.Display the Developer tab to enable the checkbox feature (for Windows)
Before you can even add a checkbox to your list, you have to enable the checkbox feature (and the tab menu it’s housed within). In this case, the checkbox feature is located within the Developer tab, which is a menu that isn’t shown by default. You have to enable that menu first. Here’s how:
Step 1: Select the File tab in the top-left corner and then choose Options in the bottom-left corner of the next screen. (You may need to select More before you can see Options).
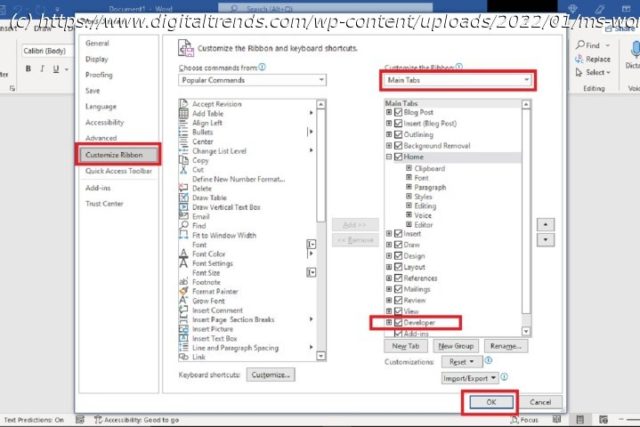
Step 2: Select Customize ribbon.
Step 3: On the Word options screen, there are two columns. Look at the column on the right. Under that column’s drop-down menu, the one labeled Main tabs, look for the word Developer and tick the box next to it. Then select OK.
Step 4: The Developer tab should now appear at the top of your screen in the main ribbon menu. You can select it to view its options and tools.Display the Developer tab to enable the checkbox feature (for macOS)
If you are working on Word in macOS, you will also need to start by enabling the Developer tab. However, the settings work a little differently. Here’s what you need to do:
Step 1: Open your Word doc. Look at the very top of the document window, where you will see icons for saving, printing, undoing, and going to the Word home page. Select the Small menu arrow on the right.
Step 2: Select More commands from the drop-down menu.
Step 3: You should now be in the Ribbon & toolbar menu. Select Ribbon to reveal more options.
Step 4: On the right side of the menu, you’ll see the option to Customize the ribbon. Scroll down here until you reach Developer at the bottom, and select it to enable this tab.
Select Save. Exit out of the menu and you will now see the Developer tab in your Word document.


