Got a new laptop recently? Here are the first things you should do on your Windows PC to make it work better for your needs.
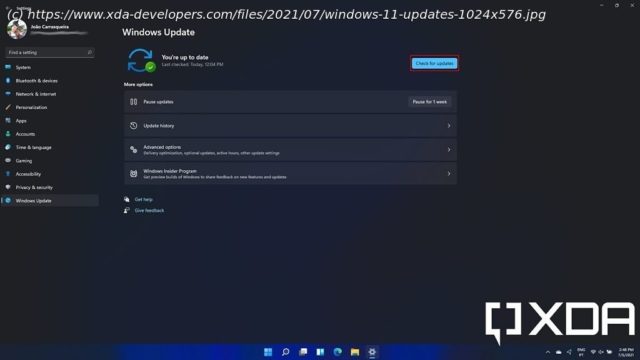
Whether it’s a gift from a loved one or something you got for yourself, getting a new Windows PC is always exciting. There’s always a bit of a rush using it for the first time, even if you’re not a big computer guy like most of us here at XDA. But once you’ve turned on your shiny new PC, what should you do? To help you out, we’ve come up with the 10 first things you should do with your new Windows PC, specifically if it’s running Windows 11. Admittedly, many of these steps are subjective; you don’t have to do all of this, but we’d recommend it if you want to get the best experience. Let’s get into it. It can be annoying, but keeping your computer up to date is important, particularly for security reasons. It can also add new features to your PC, and if your new PC is still running Windows 10, you can get Windows 11 this way, too. To get the latest updates for Windows, open the Settings app (from the Start menu, for example) and go to the Windows Update (on Windows 11)/Update & Security (Windows 10) page and click Check for updates. Any updates that are available will begin downloading and installing. Some of them may require you to restart your PC, and we recommend checking back once the updates have installed, as new updates may show up. If you’re on Windows 10 and you want to upgrade to Windows 11, you may want to check out this article on how to get Windows 11 right now. You may also want to update the apps that come pre-installed with Windows, which update separately using the Microsoft Store. To do this, open the Microsoft Store app then click the Library page in the bottom left corner. Here, click Get updates and wait it out. Almost all the preinstalled apps are likely to have updates, so this process may take a while. With that out of the way, you’ll have all the latest security improvements and features available. When you first set up Windows 11, you may see a lot of icons pinned to your taskbar and Start menu. Some of them are useful, and some of them aren’t, so it’s a good idea to clean up and remove anything you don’t need from your sight. Let’s start with the taskbar. Right off the bat, Windows 11 includes a few icons on the taskbar, including Task View, Search, Widgets, and Chat (powered by Microsoft Teams). You may also see your browser and some apps pinned here. To remove the Windows 11 icons we just mentioned, right-click an empty area of the taskbar and click Taskbar settings. You’ll see a settings page that lets you disable or enable the icons for Windows features. To remove apps pinned to the taskbar, simply right-click their icon and click Unpin from taskbar. As for the Start menu, you’ll see a few apps pinned to the main page when you open it up, many of which you might not want. Simply right-click the icons of the apps you don’t care about and choose Unpin from Start. You can also click Uninstall if you don’t want the apps on your PC at all. And speaking of uninstalling apps… Windows PCs traditionally come with a whole lot of pre-installed software. Windows 11 itself includes a lot of apps out of the box, but if you got a new PC, there’s a good chance that the manufacturer also installed a ton of things you don’t care about. What you need and don’t need is up to you, of course, and the best thing you can do is go through your list of apps and see if you find them useful. Open the Start menu and click All apps to see everything that’s installed on your PC. If you see an app you don’t recognize, you can open it to see if it’s worth anything to you, and then keep it or uninstall it. To uninstall an app, right-click it and select Uninstall. If the app is available and updated through the Microsoft Store, it will be uninstalled right away. If it’s a “classic” app from outside of the store, you’ll be taken to the Control Panel, and there you have to select the app again and click Uninstall. We do advise you to look out for apps that might help your PC function as intended, though. Some manufacturers include their own update tools for drivers, and you might not want to uninstall that. It’s also a good idea to look up the name of the software if you’re unsure whether you should remove it or not. Even if you choose to keep certain apps, you may not always want them to start with your PC. Having apps run on startup can make your computer take longer to boot, plus those apps might be using resources when you don’t need them to. To see the apps that are currently starting with your PC, right-click the Windows icon on the taskbar and choose Task Manager. Here, click More details (if you haven’t already) and switch to the Startup tab. You can disable the apps that you don’t need all the time so our PC starts a little faster. If you notice something stops working, you can always go back and re-enable the apps.


