Personalize your Apple Pages docs by adding a custom signature. Here’s how to create and insert one in Pages for macOS, iOS, and iPadOS.
Adding a signature to your Apple Pages doc is one of the best ways to solidify your authorship. It’s also a nice calling card if you plan on sharing your Pages file with others, or if you decide to export it to PDF. Fortunately, creating and inserting a signature in Pages for macOS, iOS, and iPadOS isn’t very difficult. To help speed things along, we’ve put together our own step-by-step guide to teach you how to start adding Pages signatures pronto!Add an image of your signature
One of the simplest ways to add your signature to Pages is by using an image. If you have a photo of your signature, you can insert it in your document in just a few steps.
Step 1: Open your document in Pages and place your cursor where you want the image.
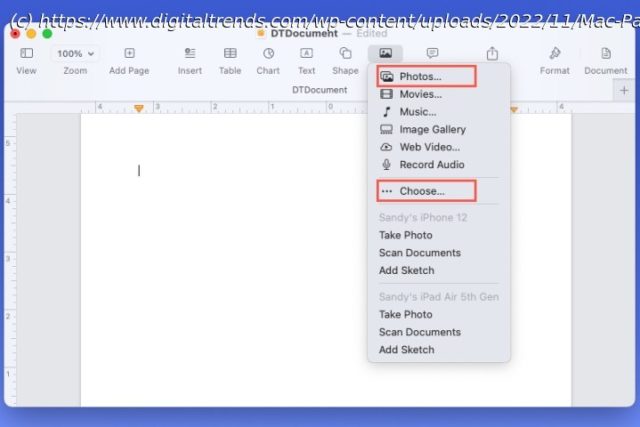
Step 2: Select Media in the toolbar.
Step 3: Choose one of the following options:
Pick Photos if the image is in the Photos app. Then, select the picture to place it in your document.
Pick Choose if the image is elsewhere on your computer. Locate the picture, select it, and choose Insert.
If the image is on your desktop or in an open folder, you can drag it right into Pages.
Step 4: You’ll then see the picture of your signature in your document.
You can drag a corner to resize it while maintaining the aspect ratio. Or, select the image and use the Format button in the toolbar to open the sidebar. Then, go to the Arrange tab and use the Size section in the side panel to adjust the dimensions.Insert a screenshot from Preview
If you don’t have an image of your signature but have a signature saved in Preview or are willing to create one, you can screenshot it and pop it into Pages.
Step 1: Open an image or PDF in Preview. Make sure that the file you open has a white background and enough space to insert your signature.


